
Camera System Made Simple!
You will love our camera system because it’s powerful and so easy to install. You will save a lot of time and tons of money. Let’s see how.
Cyberonic powerline system uses the electrical wiring in your building to create a network. Because it requires no new wiring, and the network adds no cost to your electric bill, power-line networking is the chepeast method of connecting computers in different areas.
Benefits
| Cyberonic Powerline Camera System |  | Traditional Wired Camera System |
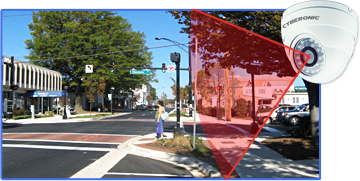
High Definition (HD) Indoor/Outdoor Dome
The camera is perfect for indoor or outdoor surveillance use when clear high definition video is required. The wide angle lens is perfect for covering a large area. The lens field of view opens up at a 78 degree angle.
- 1 megapixel, 1/4″ Progressive scan CMOS
- 1080P/D1,1080P/720P/D1HD1/VGA/CIF/QVGA/QCIF
- IP Camera, Weather Proof, with IRCUT FILTER
- HD professional lens 3,6mm
- 30 LED for 35 Meters
- ONVIF
- Support Multi-Screen software and CMS
Support Protocol: TCP, UDP, IP, HTTP, FTP, SMTP, DHCP, DNS, ARP, ICMP, POP3, NTP, IPSec UpnP, RTP and RTCP
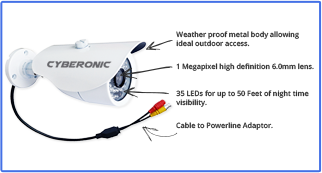
High Definition (HD) Indoor/Outdoor Bullet
The camera is perfect for indoor or outdoor surveillance powered by 35 LEDs allowing pristine night and day monitoring. The angle of view is 49⁰ allowing for longer range of visibility.
- 1 megapixel, 1/4″ CMOS sensor.
- 720p HD Video, 1280 x 720 pixels for higher resolution, sharper picture & video, cover more details and space.
- Water Proof/Weather Proof, with IR-CUT support
- HD professional lens 3.6mm.
- Support Multi-Screen software and CMS.
HD NVR – 4 Channel Network Video Recorder
How it works:
- Connect the PLC adapters of cameras and the recording device (NVR) to electric outlets.
- Connect a monitor and mouse to the NVR.
- NVR will automatically detect connected cameras for viewing in seconds.

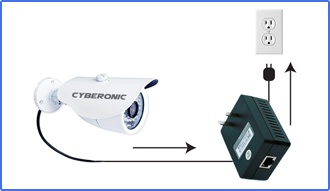
- Set your system so you can receive email alerts at the first sign of trouble.

IR Cut Day and Night Vision
IR Cut Filter blocks infrared light but allows colors visible to the naked eye to pass through. During low/no light conditions, the IR Cut Filter moves away from the lens to let in 100% of the infrared light for maximum night vision performance. This results in the camera image changing to Black and White for better image quality.


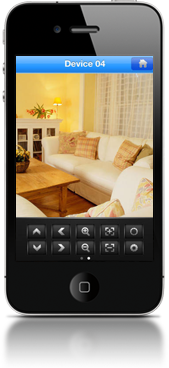
Watch Recording on Smart Phone

Worry-free Monitoring
After the initial setup, the NVR will be uniquely identified with your user account so that no one else will be able to access your videos and camera without your permission. Enjoy peace of mind knowing that your privacy and belongings are kept safe.
Never Unaware
You don’t have to be at your PC or NVR to monitor your property and your belongings anymore. With advanced motion detection and alert features, you will always be kept updated on the well-being of the things that you treasure most. Our software will send an email alert, complete with photo of the activity, if any motion is detected.
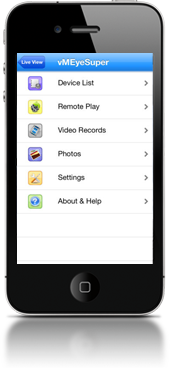
Easy connection with QR code setup on iOS and Android
With a quick and easy set up all you have to do is simply scan the QR code from the display monitor using your smartphone or tablet with our downloadable app. Never before has it been such a breeze to set up a security camera IP system. The included free mobile app has been developed to exceed mobile surveillance standards, allowing the user to fully configure recordings and other settings on the camera.
Update your Firmware through your mobile device
Updating your firmware has never been easier. Our app will tell you if an upgrade is available, all you have to do is tap a button and let our app do the rest.


![]()
Quick Setup Guide

1. Preface
This guide will help you get our system up and running locally, via the Cyberonic Camera Management Wizard and via the Cyberonic Cloud software over Internet Explorer for Windows. Other solutions require additional documentation and configuration.
Visit us online at:
www.cyberonic.com
For technical support or any other issues contact us at:
![]()
2. Hardware
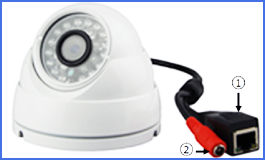
EJ-series IP HD Camera

1. Network 2. DC 12V Input
HQ-series IP HD Camera
1. Network 2. DC 12V Input
Q-series professional IP NVR

1. USB 2. Power Indicator
3. Alarm Indicator
4. Record Indicator
5. Remove Receiver
EJ-series IP HD Camera
 6. HDMI 7. VGA
8. Netowrk 9. Power
Splitter
 1. Network (M) 2. Network (F)
3. DC 12V Output
PLC Adapter

1.Network/Power 2. Status
Important: A splitter must be used to separate power from data before connecting to networking equipment or damage may result.
![]()
3. Installation
Note: Please follow these instructions carefully to avoid damaging the equipment. PLC adapters should be connected directly to wall jacks, do not use power strips or other electrical equipment. Connecting them through power strips, battery backups, etc. may cause them to not function properly.
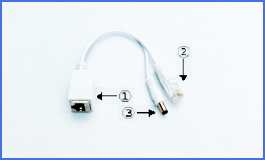
 3.1 Connect PLC to the camera

- Connect an Ethernet cable to a PLC and plug the PLC into a wall jack.
- Connect the other end of the Ethernet cable to the network port ① on a splitter splitter.
- Plug the video connector ③ of the splitter into the red DC 12V input jack of the camera ②.
- Plug the Ethernet connector of the splitter ② into camera port ①.
- Repeat with all other cameras you wish to install.
3.2 Connect PLC to the NVR

- Connect an Ethernet cable to a PLC and plug the PLC into a wall jack.
- Connect the other end of the Ethernet cable to port ① of a splitter.
- Plug the Ethernet connector of the splitter ② into Ethernet port ⑧ on the NVR. Leave the power connector of the splitter ③ unplugged, as it in not needed for the nvr.
- Connect the NVR Power Adapter to port ⑨ in the back of the NVR and plug the NVR Power Adapter into a wall jack.
3.3 Connect NVR to Monitor & Mouse

- Use a VGA or HDMI cable to connect a monitor to NVR port ⑥ or ⑦.
- Connect the included mouse to one of the USB ports ① in the NVR.
At this point you are ready to use the Cyberonic Camera System without connecting to the Internet.
3.4 (Optional) Connect Cyberonic Camera System to the Internet

- This section replaces section 3.2
- Connect an Ethernet cable to a PLC and plug the PLC into a wall jack.
- Connect the other end of the Ethernet cable to port ① of a splitter.
- Plug the Ethernet connector of the splitter ② into your Internet switch or router.
- Using an Ethernet cable, connect Port ⑧ of the NVR to your Internet switch or router.
- Connect the NVR Power Adapter to port ⑨ in the back of the NVR and plug the NVR Power Adapter into a wall jack.
3.5 NVR Wizard Setup
3.5.1 Follow the on screen prompts by navigating using mouse. This will automatically configure the cameras and connect them to NVR.
Congratulations!
Your new security camera system is now ready to use!

- High resolution, clear and smooth image.
- Support automatic turn color to black/IR - CUT, day and night monitoring.
- Support all types of superposition of information (such as ID, IP, DDNS server, etc.), easy to use.
- Using advantage H.264 High profile video compression,very low bitrate and high definition image.
- Support dual stream.
- Support (iPhone, Windows Mobile, BlackBerry, Symbian, Android).
- Support (IE, Chrome, Firefox, Safari).
- Support auto iris and electronic shutter.
- Support connection with HVR/NVR and Onvif.
| Model | ICYB5110 |
| Image sensor | 1/4" CMOS Sensor |
| Low Illumination | Color:0.1Lux with IR B/W:0.01 Lux with IR |
| Electronic Shutter | 1/50(1/60)S~ 1/10,000 S |
| Lens | 6mm |
| Lens mount | M12 |
| Day/Night | Support IR-CUT |
| Video Compression | H.264 HighProfile, JPEG snapshot |
| Bit rate | 32 Kbps~8Mbps |
| Audio Compression | G.711a |
| Max.image resolution | 1280×720 |
| Frame rate | 50Hz: 25fps (1280×720) 60Hz: 30fps (1280×720) |
| Image setting | Saturation, Brightness, Contrast adjustable through client software or Web server |
| Storage | Network storage | ||||||||||
| Intelligent Alarm | Motion detect, Video loss, Network disconnention, IP address conflict | ||||||||||
| Protocol | "TCP/IP | HTTP | DHCP | DNS | DDNS | PPPoE | SMTP | NTP (HTTPS | SIP | 802.1x | IPv6 optional)" |
| Basic | "Anti-flicker | dual stream | heartbeat | password protection" |
| net interface | 1 * RJ45 10M/100M |
| Working condition | "-10~60 | Humidity 90% or less(non-condensing)" |
| Power supply | DC12V±10 | |
| Power consumption | “IR3”:6W MAX; | |
| Protection range | IP66 | |
| IR distance | “IR2”:20-30 M; | |
| Dimension | length: 160mm. Case: F44mm*90mm | |
| Weight | 300g |

- Acess to network easily without laying cable
- Stable signal, transmission speed up to 200Mbps
- Transmission distance: > 300 meters
- Plug and play,simple to operate
- 128 bit AES encrypting, ensuring safe and reliable data
- Stable and normal working under peak periods with 100V~240V voltage
- Radiation-free, low consumption

- Use highly advanced image sensor,resenting vivid and clear pictures.
- Support automatic color change/IR-CUT, realizing day&night non-stop monitoring.
- Introduce advanced H.264 HP video compression, achieving ultra-low bit-rate, superb high-definition picture quality.
- Support various information superimposed (such as:ID, IP, DDNS and so on),convenient to operate
- Support dual-stream
- Support various mobile long-distance monitoring(iPhone, Windows Mobile, Black Berry, Symbian, Android)
- Support multiple web browsers(IE, Chrome, Firefox, Safari)
- Support auto electronic shutter, adapt to different monitoring environment
- Web and CMS supporting, central management software MYEYE, providing SDK development.
- Support HVR/NVR/NVD connection, Conform to ONVIF

4. General Config & Setup

4.1 NVR Network Setup Screen
Go to <Main Menu>-<System>-<Network>
Default IPs:
[IP address]: default is 192.168.1.9
[Subnet Mask]: default is 255.255.255.0
[Default Gateway]: default is 192.168.1.1
Note: IP address of your NVR should be in the same subnet as your local area network and must not conflict with any existing IP addresses. Select “DHCP Enable” if you would like your router to assign an IP to the NVR.
![]()
4.2 Network IP Configutation

Go to <Main Menu>-<System>-<Network>
4.3 NVR Default Login
The default usernames are admin and guest. No password is needed.
![]()
4.4 Record Config. And Video Playback
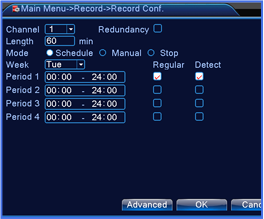
- Local video config path:
[Main Menu] > [Record] > [Record Conf.] - Use settings such as
[Channel], [Length], [Mode], [Period] and [Record type] to configure your equipment to your liking. - Video playback path:
[Main Menu] > [Record] > [PlayBack.]

- Playback control
- Time display
- Synchronous
- Video type
- Time schedule options
- Search by time/switch mode
- File Attributes
- Listed Files
4.4.4 Video Playback
Click playback button on the left to enter video search interface, you can search the video via the following ways: playback pattern, playback mode, video type, and video quantum.

After search, you can playback and download the file at playback interface.
![]()
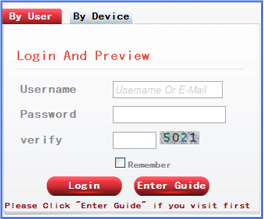
4.5 Pro IP DVR local login

Login before operations and configurations. When the NVR boots up, the user must login and the system provides the corresponding functions with the user preview. The names are admin and guest. No password is needed. For your system security, please modify your password after first login. The login interface is as follows:
![]()
4.6 Accessing NVR Using Browser
4.6.1 Type in the default IP http://192.168.1.9 or the manually assigned IP address.
Note: The ActiveX plugin needs to be installed in IE. To install plugin, Go to:
<internet options>–<security>–< Customized Level>–<ActiveX >,
enable them all, or go to (http://www.xmeye.net) to use cloud service).
4.6.2 Don’t forget to download xmeye’s mobile app available on iOS and and android.
[Main Menu] > [Record] > [PlayBack.]
![]()
4.7 Cloud Operations
 4.7 Cloud Operations
4.6.1 Cloud technology is easily setup with one step on the Internet, which greatly facilitates the user’s needs for public network monitoring. For first use, please start here. If not, just skip step.
10.1 PC access
- Cloud service website login.
- Install step by step according to the guides.
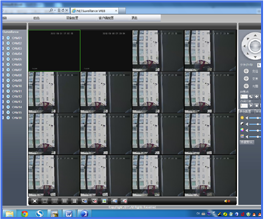
- Click login to enter cloud service interface, double-click left camera to connect to the preview, as follows:
- After successful configuration, wherever and whenever you are, as long as you can surf the Internet ,you can get access to the device.
PC monitoring: Login http://www.xmeye.net;Login with user name and password (user name: guest password: 123). - Device list is on the left, click the device to preview it.
 PC monitoring: Login http://www.xmeye.net;Login with user name and password (user name: guest password: 123).
10.2 Mobile Access
Network environment: WiFi, 3G
Mobile system: Android, iOS Apple Software
Name: VmEyeCloud
Software Download: Google Market, iTunes app store
![]()